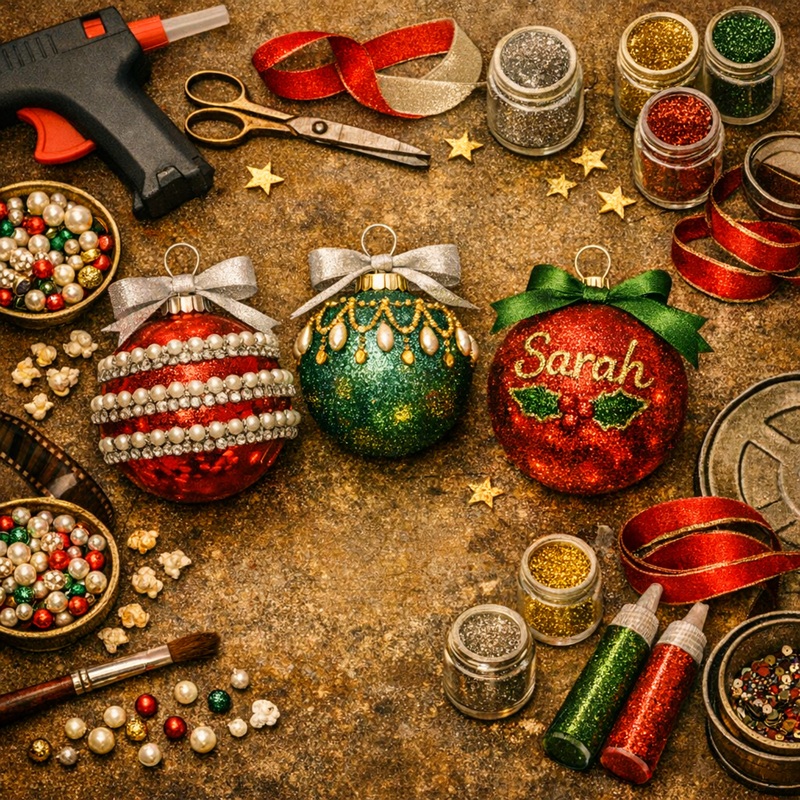
We earn a commission through some of the links and banners on this article.

ADVERTISEMENT

How To Make A 1950s Christmas Bauble

Nothing beats making your own baubles to hang from your Christmas Tree and often or not they can look better than store-bought ones. Adding a little glitter, a few beads and of course a sprinkle of festive fun, heres how to make a Christmas bauble in a 1950s style. We were kindly supplied the products by Hobbycraft for the how to.

The team here at UTCT headed down to Carlisle to Hobbycraft and had set ourselves a 1 hour time allowance to browse the store – three hours later we literally had to be dragged away kicking and screaming (and that was just John!)

Learn how to makea 1950s Christmas tree bauble below using our step by step guide or you can simply press the play button and watch how Holly made it on our official YouTube demonstration channel below:

We were able to find a whole host of little bits and bobs that would help us to transform a regular Christmas Bauble that we had lying around our offices into something more unique for our Christmas Tree but we also really enjoyed being creative (and if we’re honest, we really loved playing around with glitter glue!).

Our Christmas Tree’s are full of shop bought standard baubles, so we have a few ways of decorating your boring baubles by using inexpensive tools and crafting accessories and to make them that little bit extra special we are decorating them with a 1950s style in mind to celebrate our Bygone Christmases series

If you prefer to see a written step-by-step guide, then read on, all of our products are from Hobbycraft.

Here’s what we used:

  • Regular Christmas Baubles
  • Glue Gun & Refill Glue – £10
  • Beads – Mix & Match pack – From £1.70
  • Glitter Glue – 3 for 2 – £1.50 Each
  • Scissors
  • Ribbon – From £1.50
  • Imagination – Priceless!

Bauble number 1 1950s style:

Step 1.   For our first design, we decided to add some beads in strips to the bauble.  Use the glue gun (which as a little disclaimer, gets very hot so if Children are ‘helping’ you, we would recommend a different type of glue – there are different varieties available from Hobbycraft) to glue small sections onto the bauble – adding beads onto the glued sections.


Step 2. Let your beads dry for a minute or two before adding some ribbon through the top to give an added edge to the look and the first bauble was complete!


How to make a vintage xmas bauble design 2:

Step 1. For a second design, glue some beads round the top of the Bauble in a petal like design to make it look a little bit more unique.

Step 2. Take some glitter glue and (very roughly!) draw in some little squiggles. Simple but so effective. Let the glitter glue dry before attempting any other design on the bauble. This will take around 5 minutes.

Step 3.  Take some of your favourite colour of ribbon and pull through where the string would go.


Bauble number 3 deisgn:

Step 1 – For our third and final design, we wrote “UTCT” using glitter glue on the bauble.  You could write your surname, a specific date, your children’s names or if you love animals as much as we do, then you could give your pet it’s own bauble with their name written on it!

Step 2 – On the back of the bauble, we drew a piece of Holly using green for the leaves and red glitter glue for the berries.  We would advise using a very light hand when doing this – we speak from experience! Let this dry completely before attempting to to any more design on the bauble as it may smudge.

Step 3 – Add some ribbon where the string should go in whatever colour you would like.


There you have it, three unique Bauble designs which have given you a lot of pleasure to design and will add something unique to your Christmas Tree without being too expensive.

As part of our ByGone Christmases, these DIY vintage/traditional bauble designs will bring back old memories and even create some new ones too.

We would love to see your designs, if you have designed your own Christmas Bauble or have any ideas, we would really love it if you would leave your suggestions in the comments below.

Leave a Reply

Your email address will not be published. Required fields are marked *

ADVERTISEMENT